Sunday, June 26, 2011

Ratan's Hairstyle while visiting Anupam's family

I watch Swayamvar Season 3 everyday, never missed any episode because I like gossip & drama a lot.
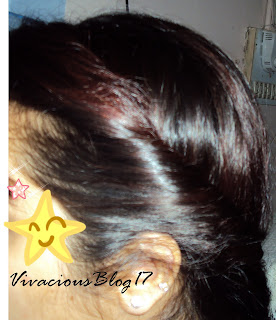
When I was watching Ratan Ka Rishta Episode 22, when she was visiting Anupam's family, I noticed her hairstyle which is looking simple but really nice too. I thought why don't I give it a try.


 So let's start-
1- Divide you hairs into two parts on center of your head. Most Indian women do this for applying sindoor.
2- Take hairs from on side of section near to your forehead & try to twist hairs inside with the help of your hands and pin up to hold your twist, as shown in the pic below.
3- Repeat the 2nd step for other side too.
 4- Now you have all your hairs at the back, start making fishtail braid, it's a bit different from the usual braid.
 5- For fishtail braid, divide hair into two equal sections. Take one small strand of hair from right side to the center and from left side take again a small strand of hair to the center, keep braiding to the length you want.
6- Secure it with any rubber band of same color of your hair.
Like it..huh?
Love,

Saturday, June 25, 2011

Chinese Love Nail Art

Well by saying Chinese Love, I meant how to say LOVE in Chinese.
I used only three things here-
  • Maybelline Colorama in Nude
  • Street wear red nail paint
  • Nail Art Brush

Its too simple. Just apply two coats of Maybelline Colorama in Nude shade (it's a very light pink color).
Take your nail art brush dip it in red nail paint and write LOVE in Chinese language as you can see in pic.
I don't know Chinese but I have Google. :)
You can choose any color for this nail art.
Hope you guys like it. :)
Love,

Friday, June 24, 2011

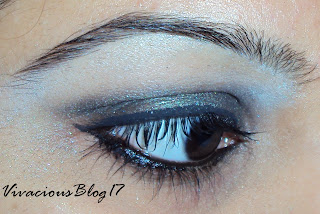
Black Green Smokey Eye

Smokey Eye look is in. This hot look will be great for parties.
You will need -
  • Black Eyeliner pencil.
  • Dark Green Eyeliner pencil.
  • Dark Green Eye shadow.
  • Highlighter.
  • Kajal

Apply thick Black eyeliner pencil on eye. You can also apply it roughly.
 Then apply green eyeliner pencil on eye lid.
 Smudge Smudge Smudge....with the help of brush.
On crease use dark green eye shadow & black eye shadow too.
 Apply Highlighter on brow bone. Make thin or thick line for eyeliner.

Apply kajal & do not forget to apply mascara.

 You can use more black eye shadow for this look.

Black & Green Eyeline
:)   :)   :)
Love,

Sponge Nail Art

When I first heard of sponge nail art, I thought its a daunting task for anyone to use sponge on nails.
But I was wrong, I think it's the easiest nail art so far. You don't have to worry about anything and just use sponge whatever the way you want.:)

I just needed four things -

  • A Sponge (Any type of sponge,cut it in a triangle or rectangle shape).
  • I used here three nail paints (purple, brown & red). You can use any two or three colors of your choice.
  • A transparent nail paint.


 Start it with a drop of purple nail paint on a paper and take the color on sponge( use edge of the sponge to take color).


Stamp the sponge to transfer the color only on 1/3 part of your nail. Repeat it on all of your nails.


Then follow it with red and brown nail paint.

Apply transparent nail paint to secure your work.
Hope you like it.
Follow my blog if you like my work. :)
Love,


Monday, June 20, 2011

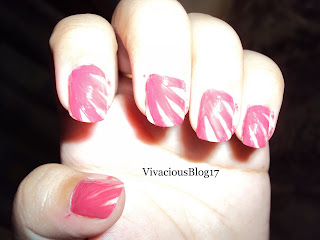
Sunrise Inspired Nail Art

Hey Guys!!
This is the first time I am using a nail art brush for my nails. Few days back I shopped online from nailsandbeauty.in, my experience was nice. They shipped within 3-4 days.
I usually shop nail art stuff from this site. They also give COD (cash on delivery) option which is boon for all the non-credit card users.

Things I used -
  • Lotus nail paint in Rose Petal.
  • Lotus nail paint in Ocean Love.
  • Nail art brush.
  • Ear bud.
  • Nail paint remover.

Take your Brush and take Rose Petal nail paint ( pink or similar to pink shade) to apply rising effect on nails we all know how the sun rise looks mostly in clip art.
Start your brush from left corner and make 4 -5 lines as shown in below picture.

Clean your brush with nail paint remover lightly so that first color can completely take off.
Then take Ocean Love which is a glittered light blue nail paint, and apply it on same lines but this time make sure to make fine/thin lines,so that both colors clearly visible.


Konad Nail Art Brush
I used orange stick with cotton dipped in nail paint remover to clear up any extra color on fingers.
Then final touch with transparent nail paint on nails when your nail paint get dry.
That's it. :)
If you like it than follow my blog. :)
cya.

Friday, June 17, 2011

Pink Grey Eye Makeup

Hello Beauties!!
I know makeup is an art & every gal can expertise this field, you just have to know how to do it correctly.
Today I did Pink grey Eye makeup look which you can do very easily.
Let's start,
First apply eye primer/base on eye lids, you can also use foundation.
Never apply eye shadow without base.
 Then apply light blue eye shadow on whole eye lid as you can see in picture.
 Apply brown eye shadow on crease.
 Then apply lightest grey on center then follow it with dark grey eye shadow.
 Apply pink eye shadow on inner corner to center.
Correct all the colors with eye shadow brush & apply little golden color on center.
Use thin line for eyeliner and apply kajal. Apply light grey eye shadow on lower line below kajal.
 At last apply black mascara to open up your eyes.
If you like it then Follow my Blog..:)
Love,

Sunday, June 12, 2011

Gorgeous Mehndi Design

Hello Everyone!!
Today I was doing some house chores & I found my very old Mehndi Designs book which I bought when I was a teenager, during my journey via train.
So I decided to make a design on my hand from that book. But first of all I wanna tell you guys that I never ever took classes for learning mehndi.

Here is what I done--


It took 2 hours for me to complete it because I was watching TV too during designing. :)


I don't know how it comes to a beautiful and clear design,it was unexpected.
I was very very happy with this. I am so proud of me..hehehehehe.....


Hope you guys like it.
Love,

Friday, June 10, 2011

My Stack Of Compact Powder


Today I am reviewing My stack of Compact powder, which I purchased a few months back. Only Lakme perfect radiance purchased recently, I actually bought this one because of so many advertisements in magazines & I read a lot magazines so finally decided to give it a try.


This is my Oriflame Visions V* Pressed Powder

  • Skin looks clearer after applying this.
  • Never broke out my skin.
  • It gives a nice matte finish but it doesn't stay for long so I have to re-apply it again n again.


Price - 129/-  after discount it was 99/- for 20g.
Oriflame Visions V*

Oriflame Beauty Matte Control Pressed Powder

  • Good for touch-ups, its advanced ultra-fine powder gives smooth matte coverage.its light weight & contains zeolite to help mattify the skin.
  • Good option for combination/oily skin. 

Price - 429/- for 8 g.

Oriflame matte control powder


 Lakme Radiance Complexion Compact 

  • It claims that it has Vitamin enriched foundation make up in compact powder format to give a radiant look.    
  • It Contains allantoin complex to soothe the skin.
  • Advanced Micromesh Technology gives a flawless matte finish & Contains Vitamin E & C that moisturizes and protects skin from pollution.
  • It gives me natural look which I adore but I don't use it much only because I have new compact of Lakme.
  • Its color is pinkish white. (Natural pearl).


Price- 99/-  (9 gms)


Lakme radiance compact

Lakme Perfect Radiance Multi Mineral Skin lightening Compact

  • I bought this in lightest shade (Ivory). 
  • It has very tiny shimmers which only can be seen in day light.
  • I really liked it when SA applied it on my wrist and I quickly said "yes" for this.
  • It gives me matte finish so good for oily beauties like me.
  • It contains sunscreen of SPF 20.
  • It stays on for 4-5 hrs.
  • It gives medium to full coverage.
  • Didn't cause break-outs.

Rating - 9/10


Price - 150/-


Lakme perfect radiance compact


 Swatches of Compact powders -


Perfect radiance, Visions V*, Lakme flawless, Oriflame matte control (left to right)
Love,


Best Blogger TipsReceive The Latest Posts Directly To Your Email - It's Free:
Email rss